After some references from other games, I realized that one of the most user-friendly thing to do in a game is to have a visible link of game objects. Take for instance, a chamber from the game, Portal:
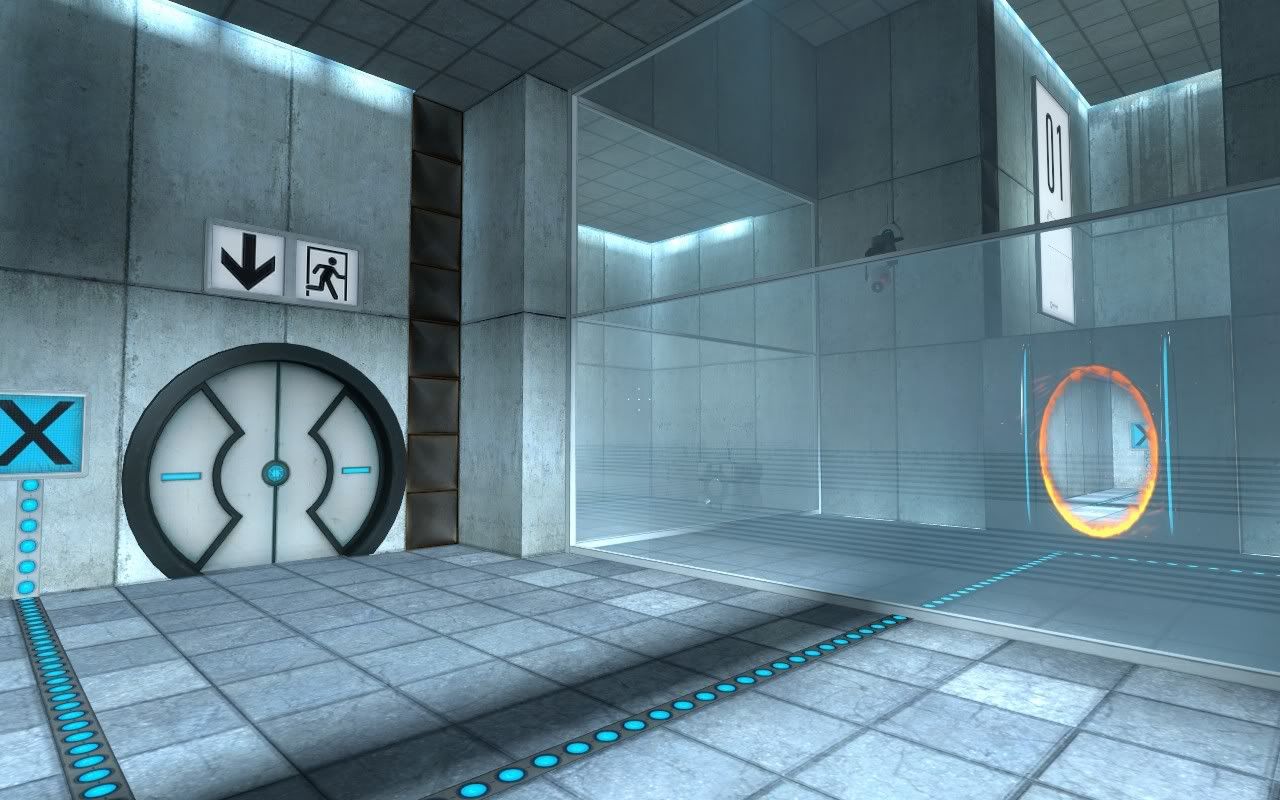
You can see how there is a red button with a blue circular chain up to a sci-fi door. The smart thing about the blue chain is that you can clearly see what elements link up with what. So if you stand on the button, the blue cross will turn into an orange tick and the door will open.
It is very useful in levels with a whole lot of different buttons connecting to different doors.
So I wanted to do something like that but original. That is when I invented, color Tags.
Color Tags are color-coded tags for different elements which tell you what connects to what.
Color tags are made up of:
The Starting Tag:
This is the tag which tells you what element you affect, e.g. Button.
In this case, the starting tag is connected to a cylinder (Draft Object) which you fire your laser at.
The Pointer Tag:
This tag is usually connected to a platform and it points you to the the Ending Tag.
You can see how the Ending Tag is popping out of a wall and it is pointing to the ending tag.
The Ending Tag:
This is connected to the object which responds to what you affect in the Starting Tag.
The ending tag is connected to a door which slides open.
What in total happens is when I shoot the cylinder, the door will side open.
The most significant part of these tags is that they are color-coded so you know that the red and green tags aren't connected.
Friday, 29 March 2013
Thursday, 21 March 2013
A Free and Cheap Way.
Despawning cubes is one of the hardest challenges I've had to face. eventually I've had to split cube despawning into three strategies:
1. Red Lazer
When shooting the red lazer, it was just like the blue lazer in the early days, (a continuous stream). The blue lazer involves shooting an individual pellet constantly. with the Right Mouse Button, it gives you a sense similar to 'spraying paint', but in this case, despawning cubes.
2. The R Key
When pressed R, any cube currently in the scene with the destroy script will be destroyed.
Simple.
3. The Single Hit
When your blue lazer hits a single cube, after two seconds the cube will despawn. Confusing at first.
There is an editable cube limit for every wall that spawns cubes. Once the cube amount reaches the cube limit, the cubes don't spawn for the certain wall and a message displays saying 'Press R'. Once you press r, the cubes are deleted and the cube amount goes to 0.
That combats lag so you dont keep spawning cubes.
When you shoot the Pause receptor, you have no indication that the cubes are now paused.
So I decided to have a screen effector. I searched up one for Unity but they were all paid! So I worked out that if I have a plane with a transparent texture, I can do it!
Free and Easy!
Now here is the video!
Tuesday, 19 March 2013
Trail
It has been quite a while and in that progress I failed at doing a hard send message cube despawn cube, but I did succeed in messing around. Here is one of the things I did:
Thursday, 7 March 2013
A Friendly Approach..
I thought about the mystical dreamy style of the game.
I soon realized (if you've noticed) that the cubes despawn after an amount of time each.
For new people, I have decided I should make it rather a time limit but a count limit.
So there is a maximum limit of cubes before they start despawning.
I soon realized (if you've noticed) that the cubes despawn after an amount of time each.
For new people, I have decided I should make it rather a time limit but a count limit.
So there is a maximum limit of cubes before they start despawning.
Resetting those Darn Cubes!
Tired of waiting 12 seconds for your cubes to despawn?
Are you thinking you could be much more productive rather than waiting those seconds for the cubes to despawn?
Here is the solution! Press 'R' to despawn your cubes!
Order an 'R' key in the next 45 seconds and you can get one free!
Too Late! Offer Ended.
Are you thinking you could be much more productive rather than waiting those seconds for the cubes to despawn?
Here is the solution! Press 'R' to despawn your cubes!
Order an 'R' key in the next 45 seconds and you can get one free!
Too Late! Offer Ended.
Lots of New Gravity Stuff
I've recently been experimenting with mass, drag, gravity and angular drag in the game. I first wanted a gate the Player passes which slows everything down. After heaps of googling, I got absolutely no answer other than some EXTREMELY complex things or things which change the whole game. Eventually I set up a gate which when a cubes goes through its drag is slowed down causing it to slow down and slowly drop. Rather than having an element in the game which helps me when I slow down time, it can be quite the opposite, being a bad element e.g. Want to spawn a box at that high ledge over there? Shoots a box there but instead of flinging to the high ledge, it hits the gate which slows it down and it drops.
I've also been customizing the platform panels and now I'm officially happy with them. The problem I faced at the start was: how can I make a chamber like this one replacing the square panels with the circles. Wouldn't there be lots of holes and the panels won't be connected:
Eventually I decided on making a connector with a design on it. The game will be set in an exterior floating world much like Qbeh:
In a matter of fact, Qbeh was creating using the same engine I'm creating Blue Box on (Unity)
So we've got the connectors, the gates, what is next?
That's right, the Pause Time Receptors!
In the video you will see, I shoot at the cube receptor and a letter P (Stands for Paused) appears. After around 5 seconds later, the P goes down. This means, when the letter P is up, I spawn cubes with 0 gravity and 0 Drag causing them to float in midair. Once the P goes down I spawn cubes which are normal again.
Be aware that the things are just plain cubes because this is beta stage (Mainly coding).When I start the actual design, it will look better. That is why the gun and platforms look different to the cube platforms.
Now for the video:
Already Wallpapers!
Iv'e already started making wallpapers! These are a low-res preview of the ones I've done so far:
I originally made the main gun on cinema 4d so I could easily add textures and render it.
I did some gradient finishes to it in photoshop.
The idea is that people who play Blue Box notice the guns really dusty but when they see the wallpaper they notice that the gun looks all clean. How the gun got dusty is a mystery so far
and maybe explained in the game (unlikely..I like the mysterious feeling).
Sunday, 3 March 2013
The Jump, The Land and the Platform.
Now that I've got some of the code out of the way, I decided to make a cross-hair which tells you where you will land. I spent ages trying to figure out a movement code which orients a 3d plane object onto a surface via players position until I realized it just need a projector. 3 days wasted!
After testing with the cross-hair, I slipped and moved the character controller script into one of the cameras. This, i then realized was one of the best accidental moves I've done because the camera rotation now adjusts the speed of the player i.e. if i'm falling and I look down, I can only do some slight movement ( Accident fakes airborne control) whilst if I look forward and walk, I go much faster.
I Finally made 5 platforms for Part 1, Dawn Winter. These platforms will be the main object the game relies upon e.g. Portal 1 relies on the wall panel:
Here is the wall panel tile in Portal 1 in use:
Now, the video you've been waiting for:
Subscribe to:
Posts (Atom)